Archive for October, 2011

October 21, 2011

The Martha Stewart Halloween Giveaway Winner Is…

Congrats to Felicia Kramer!

She is the winner of our Martha Stewart Halloween Giveaway. She has won a gift prize with the following inside, Glow in the Dark Sealer, a Basic Brush Set, 3 Glow in the Dark paint colors (Yellow, Green, & Orange), 2 Chalkboard paint colors (Black and Gray), and a bottle of Water Resistant Fabric Stiffener.

Thanks to everyone that participated and entered this giveaway. If you were not the winner this time, don’t worry we have another great giveaway coming up very soon. Be sure to check back daily on Paint Me Plaid, so you don’t miss your chance to enter.

October 21, 2011

Freelance Friday: Christmas Tray Made with New Easy To Paint Stencil

Can you believe that Christmas is only right around the corner? I know some of you are trying to deny it, but people get ready because it is coming and fast! Now I am sure some of you have already begun crafting for the Christmas holiday, but if you have not gotten started it’s ok there is still time. We here at Plaid wanted to start giving you some craft ideas that are easy to make, with products from our new Easy to Paint line. Recently one of our blogger friends, Megan, from the Brassy Apple created this adorable Christmas Tray. This tray was created with one of the new stencils from our Easy to Paint line. Click here to learn from the Brassy Apple how to make this Christmas craft.


October 20, 2011

Teaching Thursdays: Learn to make a Monster Bean Bag Throw with Martha

When it comes to decorating a birthday party, there are so many different themes you can choose from. One of our blogger friends Kristyn from, Lil Luna, recently threw a monster themed birthday party for her son. She made some fantastic decorations, including this monster bean bag throw. When I saw this project, I was so amazed with how creative she was with only a few supplies. Click here to learn how Kristyn made this awesome Monster bean bag throw, and to see more pictures from this adorable birthday party.


October 19, 2011

Web Wednesday: FolkArt Halloween Tealight Shade

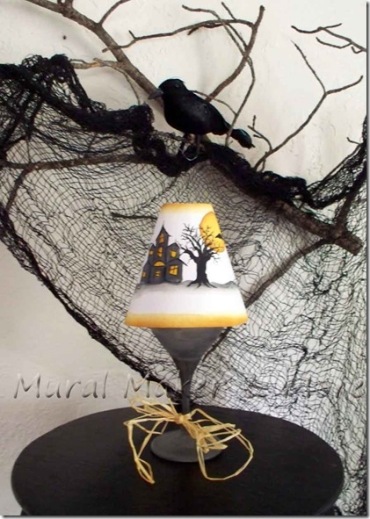
We are always so amazed by all the creative and wonderful crafts we come across on other craft blogs. Recently Colleen, from Mural Maker and More, shared with us this wonderful Halloween lampshade. How awesome is this? This lampshade was created using several colors of FolkArt paint. To see the step by step instructions on how to re-create this lampshade click here. Have you ever used a lampshade as a surface to craft on?


October 18, 2011

Martha Stewart Halloween Giveaway!

It’s time again for another giveaway here on Paint Me Plaid. The new Martha Stewart Craft line is very extensive, and has so many amazing products. Well in this giveaway we want to highlight some products from the new Martha Stewart craft line, that would be great to use during this Halloween season. We are giving away the prize pack below to one lucky Paint Me Plaid reader. This prize pack includes: Glow in the Dark Sealer, a Basic Brush Set, 3 Glow in the Dark paint colors (Yellow, Green, & Orange), 2 Chalkboard paint colors (Black and Gray), and a bottle of Water Resistant Fabric Stiffener.

All you have to do to enter is leave a comment below, telling us what Halloween craft you would create using any of these items.

For extra entries (leave a separate comment for each):

Check out our sister blog, Plaid Kid’s Crafts, and let us know a project you find there that you think is cool

Like Plaid on Facebook and let us know you entered the giveaway

Follow @PlaidCrafts on Twitter

Entries will be accepted beginning today, and end on Friday October 21st at 12pm EST. We will announce the winner on Friday afternoon October 21st.


October 18, 2011

Tuesday Huesday: Decorating Ideas For Halloween

Halloween decor for the home can often time surprise people. Just take a look at this picture above. If someone told you, they were decorating their home for Halloween, would you think it would look like this? Probably not, because most of us only think of Halloween decorating that includes ghosts, blood, and cobwebs. The picture above is just to serve as inspiration to show you that when decorating for Halloween, there are some chic design options. Would you ever think about decorating your home for Halloween, without the ghouls and goblins?

This palette was created using FolkArt acrylic paint colors:#479 Pure Black, # 741 Glazed Carrots, #226 Yellow Lemon, #903 Tapicoa

October 17, 2011

Ask Plaidie Laddie: Can The New Martha Stewart Craft Paints Be Used on Tin?


Plaidie Laddie is back today, and ready to help tackle any urgent craft and painting questions. Don’t be alarmed by his fur and paws,  he is a very skilled and knowledgeable crafter. Looks can be deceiving :)   For those of you who may be new to our blog, Plaidie Laddie is our loyal Plaid pooch, and one of our blog contributors. Throughout the month he helps answer your most burning craft and painting questions.  This week’s question is concerning the new paint from Martha Stewart, and tin surfaces.  A customer called us here at Plaid to ask the following question:

“I wanted to use paint from the new Martha Stewart acrylic paint line, on tin. Is tin an appropriate surface I can use this type of paint on?”

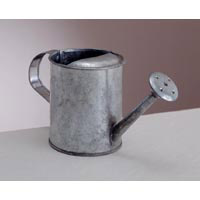
This is a great question. Tin is a wonderful surface to decorate with Martha Stewart Multi-Surface Acrylic Craft Paints. As with any painting project, surface preparation is key to proper paint performance. Tin can often times be a surface that many may not know how to clean. No worries, we can help you with that 🙂 Tin must be thoroughly cleaned before painting with the new Martha Stewart Multi-Surface Acrylic Craft Paints. Before painting on galvanized tin, you must first wash it with soap and water. When dry, wipe with white vinegar using a dampened cloth. Let it dry and wipe again with clean water. If you are unsure if the tin you are using is galvanized, clean as instructed above to ensure proper paint performance.

Try making this great Halloween craft using tins and paint from the Martha Stewart Craft line. Click here to find the step by step instructions.

October 17, 2011

Make it Monday: Hanging Halloween Decor

by: Julie Lewis

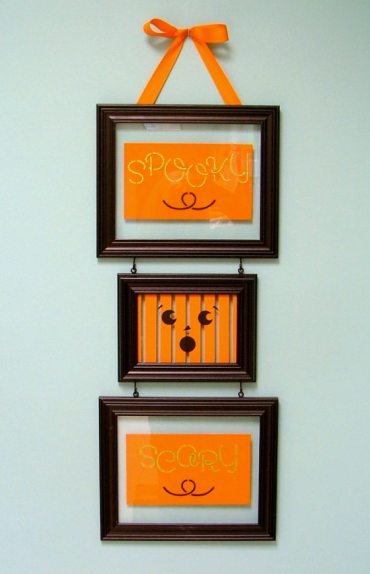
Halloween may be right around the corner but, there is still plenty of time to create something special for your home or for that spirited party planned. This unique and easy hanging frame décor featuring Martha Stewart Crafts™ can be done within a day. The compliments won’t stop from your ghoulish guests.

Here is all you will need:

Martha Stewart Crafts™ Multi Surface Satin Acrylic Craft Paint – 32057 Mace, 32082 Beetle Black, 32084 Green Curry, Martha Stewart Crafts™ Multi Surface Glitter Acrylic Craft Paint – 32161 Peridot, Martha Stewart Crafts™ Stencil Set – 32273 Looped Script, Martha Stewart Crafts™ Patterning Tape – 32238, Martha Stewart Crafts™ Stencil Tape – 32292, Martha Stewart Crafts™ Foam Pouncers – 32243, Martha Stewart Crafts™ Adhesive Stencil Film – 32250, 2 – 8” x 10” black picture frames, 1 – 5” x 7” black picture frame, 4 – eye hooks, 4 – cup hooks, Orange gros grain ribbon, Pliers, Adhesive glue, Paper/pencil, Ruler, #1 liner brush, Craft knife/cutting surface


Print out your pattern and gather your supplies. Remove the glass from your frames and punch out the letters needed for your words.

Place your pattern on your cutting surface and tape a piece of adhesive stencil over it.

Cut your stencil like this and set aside.

On a piece of paper, trace your words out to create a pattern for stenciling.

Find the center of your 5 x 7 glass and place a strip of the ¼” patterning tape.

Place three more strips of tape equally spaced on either side of center strip.

Apply Mace with a pouncer over tape. When slightly dry, apply more coats if needed.

Carefully remove tape from glass. You can clean up any fuzzy edges with your craft knife.

Tape your face pattern under the glass for positioning, then place your adhesive stencil on top of glass.

Apply Beetle Black and remove stencil…now your middle piece is done!

Center and tape your traced out words to the back of the 8 x 10 pieces of glass.

Apply Green Curry to letters and Beetle Black to stencil flourish.

Use brush to paint Peridot Glitter over letters, Apply several coats as needed.

Cut two 5” x 8 ½” pieces of paper…center and tape over the front of your stenciled words.

Flip your glass over and tape off rectangle.

Apply several coats of Mace and remove tape.

Paint your eye hooks and cup hooks with Beetle Black. A tip is to stick them in a piece of Styrofoam or something to hold them so you won’t have to when painting…let dry.

Measure in 2 ½” from ends of larger frames and mark with pencil for hooks.

Place a piece of tape to mark center for large and small frames. Line up centers and then mark on smaller frame where you marked on larger frame for exact hook line up.

Use your craft knife to start a hold and screw in your hooks. Cup hooks on one frame and eye hooks on other frame.

Create a bow from ribbon leaving long tails and secure bow with glue so it won’t untie.

Remove glass holders from frames with pliers. Apply adhesive glue to inside edge of frames and insert your glass pieces.

Glue hanger at desired length and cut off excess.

Hook your frames together and hang your eye-catching Halloween décor!
October 15, 2011

Watch These New Plaid Craft TV Videos

Did you know that Plaid has a channel on YouTube. Our channel is called, Plaid Crafts. On this channel you will find helpful craft tutorials from crafting gurus, Cathie and Steve. You will also find information about new Plaid products. Please take a look at some of our latest videos, and feel free to leave comments. We would love to know what you think of them, and if there is a video you would like us to create.

Watch this video to see how mod podge transformed a dollar store mirror, into a great gift!

See what happened at a live in store event at Michaels, featuring Cathie and Steve.

Watch this video to learn about our new Simply Screen Custom Silk Screen Kit.

October 14, 2011

The Mod Podge T-Shirt Winners Are…

Thanks to everyone that entered for a chance to win one of the new Mod Podge t-shirts. The contest is now closed and the 4 winners are,

Heidi

Mary

Marie

Pam

(All winners have been emailed)

If you did not win this giveaway don’t worry, you can still get your own Mod Podge shirt here. Please be sure to check out Paint Me Plaid daily, as we go giveaways often. Don’t miss out on your next chance to win!