Posts tagged ‘Apple Barrel’

January 20, 2012

The Winner of the Apple Barrel Giveaway is…

Thanks to everyone that entered our Apple Barrel giveaway. I hope this week you learned more about Plaid’s Apple Barrel brand. The prize up for grabs is, a 16 color Apple Barrel paint set.

Congratulations To:

Jacque A.

(Winner has been notified by email)

We will be having another giveaway shortly. Make sure you subscribe to Paint Me Plaid so that you can be the first to know. Have a great weekend!

January 16, 2012

Apple Barrel Paint Giveaway

Hooray! It’s giveaway time again on Paint Me Plaid. This week we are giving away some product from Plaid’s Apple Barrel brand. 1 lucky Paint Me Plaid reader will win a 16 color Apple Barrel paint set. Take care of all your painting projects with this acrylic paint set that comes with a free brush! Includes an assortment of 16 popular colors, each in 1/6 oz. resealable pots. This set is great for your kids to use. Perhaps use these colors to create some Valentine’s Day crafts. We will announce the winner on Paint Me Plaid on Friday (Jan. 20th), in the afternoon.

Apple Barrel 16 Color Paint Set

To enter this giveaway, all you have to do is leave a comment below telling us what you would use these products to create? For extra entries (leave a separate comment for each):

Like Plaid on Facebook and let us know you entered the giveaway

Become a follower of our on Twitter

Check out our sister blog, Plaid Kid’s Crafts, and let us know a project you find there that you think is cool

The contest will end Friday January 20th, 2012 at 12 noon EST.

January 16, 2012

Meet Apple Barrel

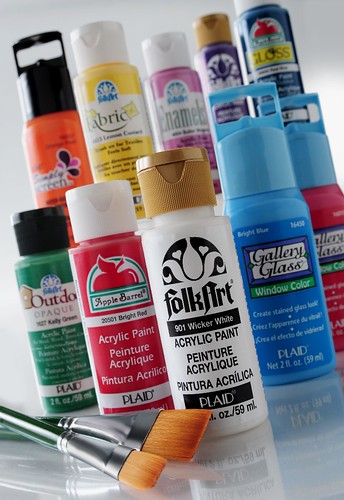
So we are extending our all about Plaid week, and will be continuing this blog series for about a month. Every week we will highlight for you a brand that is under the Plaid umbrella. This week meet, Apple Barrel. Apple Barrel make family crafting fun. Apple Barrel® Colors are crafters’ choice for projects large and small. Made from the purest ingredients, Apple Barrel Colors provide premium performance on wood, Styrofoam, paper mache, tin, terra cotta, plaster and any porous surface. It comes in a rainbow of clean colors in traditional matte finish and gloss that’s great for outdoor projects, too. Moms love it for kids’ projects, thanks to its non-toxic, waterbase formula–soap and water clean-up is a breeze. To see projects, and view the entire Apple Barrel inventory click here. Also to see more kid friendly project using Apple Barrel paints, check out our sister blog Plaid Kid’s Crafts.

October 24, 2011

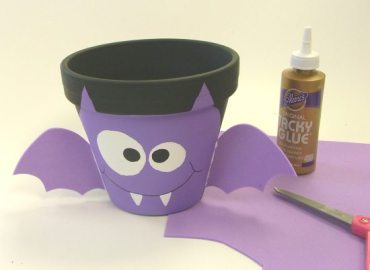
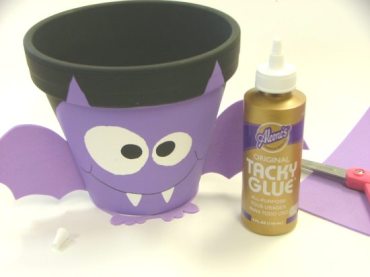
Make it Monday: Halloween Batty Pot

By: Sherrie Ragsdale


Let the countdown begin to Halloween. With only a few days left, here is a cute, and creative Halloween craft to make. It’s perfect for kids to make also. Use this batty pot, to hold all your Halloween goodies.

To make this adorable bat pot you will need the following supplies,

Apple Barrel Paints:

20226 Petunia Purple

20504 Black

20503 White
6” Clay Pot
Black Permanent Marker
1 ¾” Spouncer
1 ¼” Spouncer
Purple Foam Sheet
Craft Glue
Paint Brushes
Scissors
Pencil
Base coat the pot with petunia purple and allow to dry.
Add the eyes of the bat by dipping the spouncers in to the white paint

Add the centers of the eyes by dipping the other end of the spouncer in black and adding black dots to the white circles.

Add the mouth by using the black marker.  Paint the triangles for the teeth with white.  Allow to dry.

Mark off a circle for the face and two triangles for the ears.  Paint around the face with black.  Allow to dry.

Using the pattern provided, cut out two wings from the purple foam.

Glue the wings to the side of the pot.

This is with both wings glued into place.

Using the purple foam, cut out the feet from the purple foam.

Glue feet to the bottom of the clay pot.

October 7, 2011

Congrats to the Winners of our Paint Me Plaid Halloween Giveaway

Two lucky Paint Me Plaid readers have won our Paint Me Plaid Halloween Giveaway. The winners are,

Melissa Cook & Ajsarts


They both won a gift package that includes the following:

A 4 pack of Apple Barrel Glow in the Dark Paints

A bottle of Glo Away

A 8oz. bottle of Stiffy

Thanks to everyone that entered our Halloween giveaway. Please check here on our blog, because we will be having another giveaway very soon.

September 19, 2011

Make it Monday: Spooky Tree


Here is another great craft project to make for Halloween. This spooky tree was designed by one of our designers, Kindra Boroff. This is a great craft for beginners, that can take between 1 hour and 1.5 hours to complete. Use this tree as a table centerpiece, porch display, or paper weight. The possibilities are endless! For more Halloween craft project ideas check out our Halloween super center.

SUPPLIES NEEDED

Fabric Stiffy: # 1550 – 8oz.

Apple Barrel paints: #20504 Black, #20503 White, #20508 Pewter Grey

¾” spouncer

#1 Script Liner

#12 Flat brush

3” foam ball,

2” foam balls

5 ½”x 2 ½”x 5 ¾” wood block

Cheesecloth

18 gauge brown paper wire

hot glue

wire cutters

drill

INSTRUCTIONS

  1. Using the brown paper wire, twist pieces together till you create your spooky tree.
  2. Drill a hole in the center of the wood large enough for the tree to fit into. Basecoat the tree and the wood Black.
  3. Mix 1 part Stiffy and 1 part Black in a small bowl. Dip the cheesecloth, sized to fit over the block, into the mixture. Squeeze out excess.
  4. Drape the cheesecloth over the piece of wood. As it dries, form the cheesecloth as desired.
  5. Using a serrated knife cut a small piece of foam off the bottom of the foam balls so they can sit flat. Paint the foam balls with Black.
  6. With a script liner and Pewter Grey paint some stripes on the balls to make it look like pumpkin lines.
  7. Write “boo” on the pumpkins as shown with White and a script liner. Insert brown paper wire into the top of the pumpkins for stems.
  8. Hot glue the tree and pumpkins on the block as shown.

Cut small squares of cheesecloth. Mix 1 part stiffy and 1 part Pewter Grey in a small bowl and dip the cheesecloth squares into the mixture. Drape the small squares over the branches as shown.

September 2, 2011

Freelance Friday: Chic Asian Block Project Using Apple Barrel Paint

Decorating on a budget is always something more and more of us are striving to do. You may often times see wonderful items you would love to decorate your home with, however one look at their retail price will lead you heading towards the nearest exit. Well check out this incredibly creative craft that was created by Joy’s Life. This craft was inspired from a more expensive version she found in a magazine. Majority of the items were found at Walmart, and the wood blocks and Apple Barrel paint are from Plaid. Such a great replica, at an amazing deal. Click here to see how Joy created this project.

August 18, 2011

Teaching Thursdays: Craft Dorm Decor

By: Candie Cooper – See more of Candie’s crafts at Candie Cooper’s Journal)

This morning I was listening to a story about the movie, “American Grafitti” on NPR.  American Graffiti is about kids living in a small town one more summer before shipping out to college.  My story is pretty much the same, except I didn’t race cars at the end.  It seemed like it took forever for orientation day to come.  I also remember picking out things like a twin size comforter, crates, a futon and shower caddy for my dorm at Purdue.  If you have someone heading to college this year, this is a great send-off gifty for the recent grad.  They are stackable nesting boxes that can be tucked anywhere and hold everything from chewing gum and shots of espresso to flashcards (at least that’s what mine would’ve held).

These are the boxes—see how they fit together so cute?

Pick out the die cuts and lay them out in the boxes.  It helps to take a picture before painting so you can see how you arranged them when it comes time to Mod Podge.

Base coat the boxes in whatever colors you like—school colors would be fun too!  If you look at the brushes above, you’ll see a flat, angled and then another flat paint brush.  The angled brush is key for getting into corners.  I used Apple Barrel paints for this project because they are a little thinner than Folk Art.  The boxes soaked up the paints and dried really fast.

Dry brushing is my favorite surface painting technique.  It’s easy and looks cool when done.  Try some Silver Anniversary Folk Art paint for this step.  My mom actually painted while I took pictures. Insert me saying, “now, hold still”…..”ok, hold still”….” I REALLY need you to hold still.”  We have fun.  She’s the queen painter in the family.

The key to dry brushing is using a really coarse haired brush, dipping it in paint and removing most of the paint off to the side.  Soft bristle brushes don’t work.  Run the brush along your wood surface in whichever direction you like.  You can always practice on a scrap surface first.

Use Mod Podge gloss to adhere all the die cuts—this is where the photo that you took earlier comes in handy to figure out placement.  Photos or school mascot bumper stickers would also be great embellishments.

Now you’ll need the small and large flat brushes (see photo above) to make some stripes around the top of the boxes.  The inner and very outer boxes get tiny stripes and the middle large stripes.  This looks really cool when they’re all together.

A tip for making stripes is to have your brush fully loaded with paint to create really solid stripes.  Less paint makes for brushier stripes.


Seal all of the boxes with Folk Art Gloss acrylic varnish.  This makes everything look nice and finished.  Let’s take a look at all the boxes….


As usual, I want a set of these for holding instant coffee and teas, tubes of seed beads and lip gloss.  Looking at that list, I still feel a bit young at heart.

Wishing you a great back to school season, I am…Candie
July 11, 2011

Make It Monday: Glitter Tulip Vase

Glitter TulipsThe friendly colors of these perennial blooms will immediately become favorites. Make them to brighten up your home, or as a fun house warming gift.

Here’s what you need to get started:

read more »

July 1, 2011

TGIF: 4th of July Magnets

4th of July Magnets
Why not keep the kids busy while you make your final preparations of the fouth with these adorable magnets by Candie Cooper. Candie is a regular contributor to our Kids’ blog. She has tons of great ideas that the every crafter in the family can enjoy.

Happy Fourth of July!