May 1, 2012
By Sherrie Ragsdale

Break out the chips, guacamole, and salsa. It’s time to have a fiesta! The first big celebration to take place this month is Cinco de Mayo, and it is this Saturday. Although it is soon, you still have plenty of time to gather some decorations to throw a party. This fiesta banner is a fun project to create. Use this banner at your party, and it is sure to be the center of attention. Below are all the supplies you will need, and we show you step by step how to create this project.
Step by Step Instructions

1. Base-coat all the hats with matching colors.

2. Cut out the stencil for the zigzag around the each out of poster board and then stencil with licorice.

3. Hot glue pompoms to the edge of each hat.

4. Stencil each letter onto poster board and in black and then cut out leaving small border.

5. Paint a curvy line using the stencil brush on each letter. See the rest of the steps here.
read more »
Posted in FolkArt Acrylic, Home Decor, Paper Crafting, Party Ideas |
Leave a Comment »
December 18, 2011

Here is a great holiday recycle project you can make. If you just ordered some Chinese takeout, your in luck. We have a great project you can create using these left over boxes. Try creating this Holiday Forest Chinese Box. This was designed by one of our designers, Kindra Boroff. See below all the supplies you will need, and the instructions below.
PLAID Supplies
- FolkArt ® Artists Pigments™ – Pure Black, 2 oz.
- Mod Podge ® Dimensional Magic, 2 oz.
- Mod Podge ® Matte, 4 oz.
Other Supplies
Chinese takeout box, Scrapbook paper, 1/8” Red satin ribbon, Hot glue, Scissors, Hole punch, Pop dots
Instructions
- Carefully unassembled the Chinese box. Using the sides as patterns, trace on the polka dot paper. Cut out and adhere to the sides with Mod Podge.
- Trace a section of the tree lined paper for the front of the box. Cut the trees out. Adhere to the front of the box with Mod Podge. Cut 2 more trees out individually.
- Apply a coat of Dimensional Magic to the trees and allow to dry completely.
- Attach the 2 separate trees to the front with pop dots as shown.
- Cut 3 ½” circle from the green striped paper. Using the circle as a template, create a scalloped edge larger than the circle. Lay the green circle on top of the polka dot and glue with Mod Podge.
- Trace a small circle around the bird and glue to the center of the large circle. Apply Dimensional Magic to the small circle.
- Hot glue the red ribbon around the edge of the box as shown.
- Punch two holes in the circle tag and tie to the top of the box with red ribbon.
Posted in Christmas, DIY, FolkArt Acrylic, Holiday, Mod Podge, Paper Crafting |
1 Comment »
December 1, 2011

Christmas trees are a holiday staple. Why not trying spicing up the traditional Christmas tree, and make one of these? These crafty Christmas trees are so unique. I love the use of bright colors, and the details. These non-traditional Christmas trees were created by one of our talented designers, Trenice Bishop. These trees would make for a great table centerpiece. Make one or all three. A very different take on the traditional Christmas tree. With this project feel free to use the embellishments listed, or whatever pleases you. This is a beginner skilled craft that is perfect for any level crafter. It will take anywhere between 30 minutes to 1 hour to complete.
Plaid Supplies:

Mod Podge (Paper Formula)
Other Supplies:


3 Styrofoam floral cones (various sizes), Paint brush, Hot glue gun, Decorative paper product of choice (includes wrapping paper or decorative sheets of paper, card stock), Adhesive gems stones, Ribbon, Tassel, Small decorative bows, Medium sized bow, Scissors, Floral pins, Snowflake ornament
Instructions

- Use the Mod Podge (paper formula) and a paint brush to apply a thin layer to the back of the wrapping paper / sheets of pare to be used. The Mod Podge will keep the paper from fraying and tearing while wrapping the cones.

- When the paper is dry to the touch, secure the paper to the foam using the hot glue.

- Trim any excess paper from the bottom of the cone once completely covered.
Directions To Decorate:
Snowflake Tree

- After wrapping the cone base with the daisy (snowflake) printed paper, add adhesive gem stones to the center of each snowflake. If the gems have trouble staying put, trying using hot glue to keep them secure.

- Use Tassel scraps to wrap the base of the cone. Secure to the cone with floral pins or a neat hot glue application.
- Finally top the tree with a snowflake ornament or snowflake floral accent.
Glitter Bow Tree

- Decorate the already wrapped cone with the mini glitter bows using hot glue.
- Add adhesive gems for even more sparkle.
- Lastly hot glue the medium sized bow to the front of the tree.
Light Pink Abstract

- Since the pattern is a bit busy, break up some of the pattern buy using ribbon along the sides of the tree.
- Hot glue the ribbon to the bottom of the cone.
- Run the ribbon up one side of the tree and down the other so that the ends meet at the same place where you started. And repeat.
- Use an ornament to place on top of the tree. Use hot glue to secure ornament or stick directly in to foam at the top of the tree.
Posted in Christmas, Holiday, Paper Crafting, Teaching Thursdays |
3 Comments »
October 5, 2011

So many of our craft friends have been making wonderful crafts with the new Martha Stewart Craft line from Plaid. Here is another craft we wanted show off. This adorable bookmark came from our friend Nikki, from Nikki in Stitches. This glitter bookmark, is a great craft for any level of crafter, and Nikki gives great instructions to follow. This project was created using scrapbook paper, Martha Stewart adhesive stencils, and glitter transfer paper. Click here to learn how to make this. Have you seen the new stencils from the Martha Stewart Craft line? If not don’t wait another minute, check them out now!
Posted in Martha Stewart, Paper Crafting, Stencils & Stamps, Web Wednesday |
Leave a Comment »
January 14, 2011

So many crafters dabble in paper crafting – and I know some of you are experts at it! If you haven’t tried combining paint with your paper crafts, you should give it a go. You might be thinking about making some Valentine’s cards, so I wanted to share this absolutely delightful one from Plaid designer Debbie Saenz. Combine paper, stencils and some FolkArt paint and you have total card cuteness. Plus, who doesn’t love googly eyes? Go here for the full instructions.
Posted in FolkArt Acrylic, Gift Ideas, Paper Crafting, Stencils & Stamps, TGIF Project |
Leave a Comment »
October 16, 2010

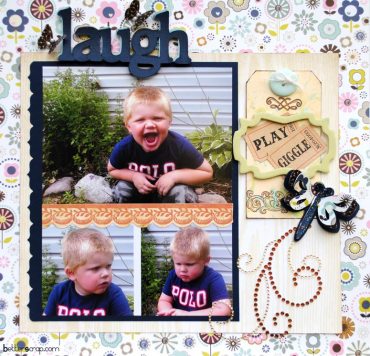
I have to confess that I frequently forget it’s possible to use paint in scrapbooking layouts. Not only is it possible, but the results are wonderful! Check out this layout by designer Beth Moore at the Better Living Through Scrapbooking blog. She incorporates some Apple Barrel colors by sponge painting her tag and then painting her chipboard frame. Beth didn’t stop there – she got really fancy with a painted shadow on the word “laugh.” This scrapbook page is so cute; it makes me smile! See the complete supply list for this layout here.
Visit Better Living Through Scrapbooking to see many layouts like this one. The October challenge currently posted is “Recycled, Reuse, Renew,” and I’m definitely inspired by what I’m seeing. You will be too.
Posted in Apple Barrel, Decoupage, Paper Crafting, Saturday Find |
2 Comments »


