Posts tagged ‘crackle’

August 8, 2011

Make It Monday: Metallic Ice Blue Fruit

There is something about contrast that draws the eye and invites visual interest. And this piece fits the bill. There is something pleasing and surprising with the contrast between the ice blue fruit, and the worn crackled plate and pedestal. Easy to make and fun to create. Follow these easy steps from Plaid Designer, Julie Lewis.

To get started you will need these FolkArt paints and assorted supplies:

2588 Metallic Ice Blue

936 Barn Wood

901 Wicker White

424 Light Gray

476 Asphaltum

696 Crackle Medium

½” Flat brush

#1 Liner brush

Brown metal or wood pillar candle holder

5 assorted artificial fruits

Decorative edged wood plate

Gray green felt

Glue

E 6000

Begin by base coating your fruit with Wicker White. Several coats should do it…allow drying time between coats.

Here they are completed.

read more »

August 4, 2011

Teaching Thursday: Tips and Hints for Crakle Projects

I used to be afraid of Crackle Medium, I’ll admit it.  It seemed so intimidating!  But practice makes perfect, and I’m here to tell you that it’s one of the easiest faux finishes around, and it makes your projects look beautiful, too!

Crackling is an effect that makes things look aged, antiqued, and without the years of wind and weather it takes to make it naturally, it makes it easy!  You can use Crackle Medium with just one color, or two, it’s really the user’s choice.  I love to use it with two colors, as I appreciate the contrast of the colors and usually take forever to make my color choices unless I’ve picked a palette beforehand.

After basecoating your project, you just brush Folk Art Crackle Medium on top of the dry surface.  And, here’s a little secret; you can stop here with the Crackle if you want to, but I like to make sure I let the Crackle coat dry completely and apply a second coat, a bit thicker than the first, on top!  I found that when I did this, my cracks were more defined.

You can apply the top coat to a surface using a number of different methods.  You can apply the paint very thick or just brush it on to get different types of cracks.  Generally, a thick topcoat creates bigger cracks, and a thin topcoat creates smaller cracks.  The style of brush you use will make the effect different, too.
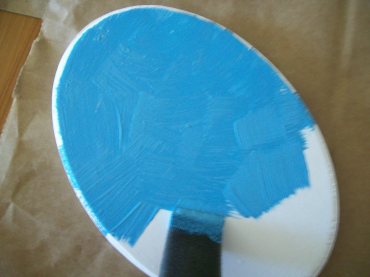
Here, I used a thick top coat, applied with a sponge brush.  I brushed the paint on unevenly, crossing my strokes while keeping my brush loaded with paint between every stroke.  You don’t ever want to brush over a stroke as this will pull the top coat away from the Crackle Medium and make an ugly mark.

The results are large, beautiful cracks heading in different directions.

You can also apply the paint in the same way with a brush.  Here, I laid down a light coat of Wicker White over a Deep Ocean Blue base-coat to show you how beautiful a darker color is under a light one.
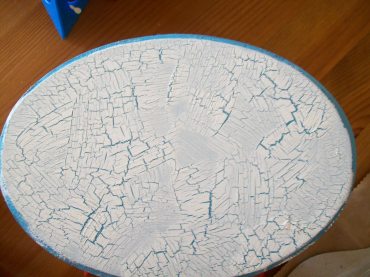
The results here are great, too.  As you can see, with the lighter top coat, you can see more of the darker base-coated color, which is just a different look from the one above.  It’s your choice which one to use.

Here is an example of using a brush for the top coat, with even strokes all heading in the same direction.

You can use Crackle Medium on just about any surface you choose, except glass and plastics.  Furniture is especially lovely when it’s aged, I think.  You can also be adventurous and try it out on a wall or two at home, if you’re so inclined!

But my biggest tip would be to play with it awhile before you commit to your project.  Try out the different methods shown here, or create your own, but definitely don’t pass by the Crackle Medium the next time you see it on your craft store shelf.  Pick it up and try it!  It’s a great way to add new dimension to your craft projects!
August 1, 2011

Make It Monday: Funky Crackled Stool

Most times, when I use a Crackle Medium, I’m looking for an aged look.  I think I’m not alone in this, most people use it to make things look old, distressed, and antiqued.  I thought it would be different  to try a project using Crackle Medium with bright colors, on a surface that can be used in a playroom or a child’s room as a place to put a favorite toy or stack books.  You don’t ever want to use these stools for your child to use as a step up for anything, as they are sold for decorative purposes only, and are not equipped with non skid feet.

I basecoated the stool using a bright palette of Wicker White, Calico Red, School Bus Yellow, and Lime Green.  When all was dry, I used tape to outline the area of School Bus Yellow in the center of my stool.  Yes, the project looks quite unfinished at this point, but I planned on adding lots of Folk Art Licorice to the stool, so I left those sections mostly bare.

And then I added the Crackle Medium.  I use a light coat to begin with and let that dry completely before adding another coat, a little thicker than the first, and let it cure overnight.  I also added Crackle Medium in the same way to the legs where I basecoated them School Bus Yellow.

Working quickly, I used a 3/4″ flat brush to apply a coat of Deep Ocean Blue to both the top of the stool and the legs.  No need to be afraid here, crackling is so much easier than you think.  I allowed the project to dry completely again and sealed it with a Satin brush on sealer.  Since I was planning on adding color on top of the crackled coat, I wanted to make sure my next color wouldn’t crack, also.

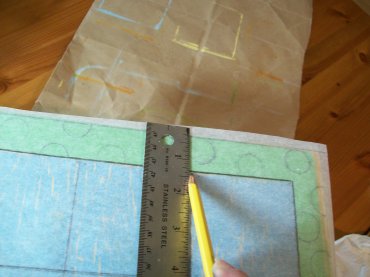
I measured out my surface onto a piece of tracing paper and drew my design on that before starting.  Here, I took my tracing paper and turned it upside down on the dry crackled surface to transfer the pattern I had made.  You can see a hint of the crackle under the tracing paper.  The yellow cracks look great under the blue top coat!

After transferring the pattern, I used watered down Licorice and a script liner brush to paint the lines in.  I didn’t try to make them perfect, just filled in as I went.  The design of this stool didn’t call for perfection, just fun!

I added Licorice checks to the sides of the stool, and dry brushed a white highlight in their centers.  I also painted large polka dots along the Lime Green border on the top.  I filled in with Licorice on the “hard-to-paint” sections of the legs, which made painting them so much easier!

July 27, 2011

Web Wednesday: Crafty Nails

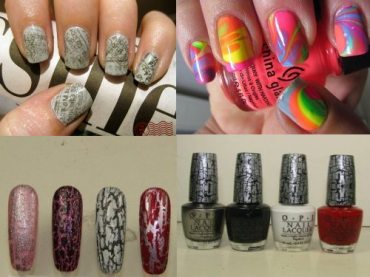
The beauty industry is getting very crafty. There are several new nail trends that are being inspired by longtime craft techniques. You probably are used to using a crackle finish to add an antique effect to a painting, or a piece of furniture. Or you are used to decoupaging a frame, plate, or tray. Well now believe it or not, you can take these same craft techniques, and infuse them on your nails. A few of the hottest trends with nail polishes today is the crackle effect, decoupaging, and tie dye. Many big beauty companies are backing this trend by rolling out entire lines inspired by craft techniques. Sally Hansen and OPI are leading the pack when it comes to this cool new nail trend. Have you, or would you try this trend? If so please leave a comment and let us know.

April 4, 2011

Make It Monday: Altered Crackle Frame

My favorite medium lately is Plaid’s crackle medium.  It’s super easy to use – you just paint it on, allow it to dry then paint over it.  Shortly thereafter, you have crackle!  Jen from My Crafty Friend Jen tried the crackle medium herself and made this awesome frame for a scrapbook layout.  I LOVE the pink FolkArt paint peeking out from under the white.  The crackle effect is so cool, and you need to check out everything she did to plus out her project here.

February 24, 2011

How to Create Crackled Backgrounds for Your Photos

Welcome to another installment of ASK PLAIDIE LADDIE!

Plaidie Laddie, loyal Plaid pooch and one of our blog contributors, wants to answer your most burning painting questions. Every week he’ll pick a question out of his virtual mailbag and answer it (with a little help from me, since he only has paws). This week’s question:

“Dear Plaidie Laddie, I love taking photos.  Are there any fun backgrounds I can create with my leftover craft paint?” -Kathy J. from California

Dear Kathy, First of all, I discovered your answer on StumbleUpon.  If you haven’t ever tried it, it’s a great social bookmarking tool that allows you to mark your favorites and then finds you additional favorites based on your selections.  It rocks!  I bookmark a lot of painting sites, and I found one with your answer.

A Lemon Squeezy Home recently did a post on creating fun backgrounds for your photography, and one of them I particularly liked: the crackle background.  Christie uses FolkArt Calypso Sky (one of my favorite colors!) and some additional supplies to create the beautiful background you see above.  There are also some other interesting techniques you could use with craft paint for more stunning backgrounds.  Visit the entire entry here, and have fun creating!

Sincerely, Plaidie Laddie

February 7, 2011

Make It Monday: Glitter Crackle Heart Frame

We’re trying some fun new techniques at Plaid – and since we love sparkle, we’re incorporating FolkArt Extreme Glitter!  With Valentine’s Day coming up, we wanted to create some quick and easy ideas to show your love to family and friends.  We took some Red Extreme Glitter and crackle medium and combined the two to make this pretty crackle heart frame.  That red between the crackle really sparkles!  Here’s how to make a frame just like this one.

read more »