Archive for June, 2010

June 17, 2010

Technique Thursday: How to Paint Plaid

Plaid is back!  The great thing about plaid’s resurgence as a pattern is the new colors involved – no longer just red and black, bright colors are an important part of this trend.  Plaid designer Holli did the project above, and I’m going to walk you through the steps.  You’ll first need some supplies:

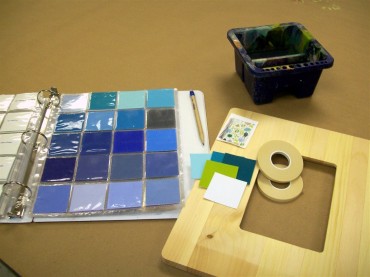
-A palette of five colors. Holli picked four brights and a lighter accent color.  Her choices in FolkArt Acrylics:

  • Color A – Jamaican Sea
  • Color B – Yellow Citron
  • Color C – Teal
  • Color D – Aqua
  • Color E – Wicker White (accent)

You’ll obviously need a surface, as well as some stencil tape – Holli used both 1/2″ and 1/8″ stencil tape.  You’ll need one larger sized roll of stencil tape and one smaller.  Finally, you’ll need a #10 flat paint brush and a smaller liner brush.

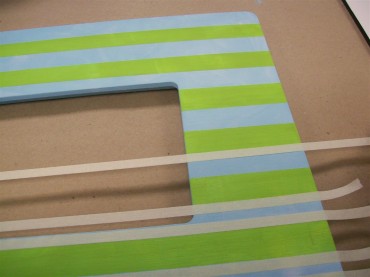
Prepare your surface.  Paint your frame with colors A and B using the 1/2″ stencil tape.  Make sure that your stripes are equal in size – you can eyeball it or you can measure it. Allow to dry.

The next step is to add more stencil tape on the color A stripes.  Using the 1/8″ stencil tape, tape off lines on both the top and bottom of color A stripes.  Paint in between the tape with color C and allow to dry.

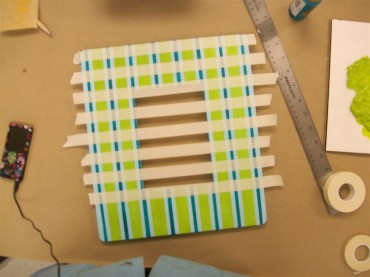
Time to flip the frame vertically to paint more stripes! Using the 1/2″ stecil tape, create stripes on the frame and paint with color B.  Once you do this, you’ll start to see the plaid pattern develop.  Allow to dry.

Go back to the color A stripes and tape on the top and bottom of them as you did before (using the 1/8″ stencil tape).  Paint with color C.  You now have stripes going vertically and horizontally with colors B and C.  Allow to dry.

Guess what?  You are going to repeat the process with color D, except this time you are going to paint in the MIDDLE of color C stripes (both vertically and horizontally).  Allow to dry.

Once your plaid pattern is done, finish it by accenting with Wicker White. You can see Holli painting hatch marks using White and a liner brush.  How extensive you get with your detail is up to you!

Add some embellishments (Holli added white foam flowers and buttons) with glue and you are ready to go.  You’ll soon be painting the town in Plaid.
Tags: , ,
June 16, 2010

A Painted Broom Makes Sweeping More Fun

I actually like sweeping, but I know a lot of people don’t.  What might make sweeping more fun?  Painted cleaning accessories, of course!  This brightly colored broom painted by the awesome ladies at Little Birdie Secrets caught my eye and I had to share. It uses FolkArt paint, so I especially had to share!  The painting is easy and the resulting broom is cute, so you should check out the tutorial here.

Tags: ,
June 15, 2010

Tuesday Huesday: Bright Watches

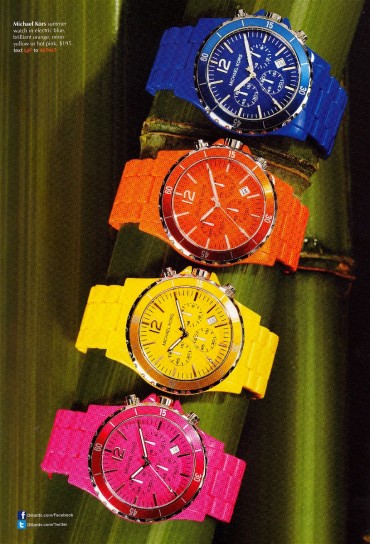
Brights are big this year – according to this article by Stylite.com, bright colors may have been brought back to encourage shopping and stimulate our economy!  No matter what the reason they are popular, I am thoroughly enjoying them, especially the accessories. A great example is this watch ad by Michael Kors, and I can imagine these with a white or pale colored outfit for a dose of “pop.”  You may want to give your painting projects a dose of pop too, so I present you with a bright palette using the watches above.  Use one or more of them as a basecoat or accent color depending on how bright you want your final result to be.

I used FolkArt Acrylic paint to create my color palette (clockwise from top left): Cobalt, Daffodil Yellow, Pure Orange, Bright Pink

June 14, 2010

Decorating Your Outside with Paint

I don’t mean the outside of your house either – I mean acrylic painted projects to be used outdoors.  Decorating your outdoor space as you would your interior is a big trend for 2010 – see a great blog post about it here.  A great way to spice up your patio is with some decorative outdoor furniture.  This table is a perfect example, and it uses FolkArt Outdoor paint with a stencil.  You won’t believe how easy it is; give it a coat of outdoor sealer to make it extra durable.  Get the instructions here.

June 12, 2010

Saturday Find: Chalkboard Brooch

I just found this brooch at Oye Modern, and let me tell you, I’m loving it.   I love everything about it except for one thing: the price.  I just find it to be so cute, that I wanted to suggest a weekend project – re-create this bad boy with FolkArt Chalkboard Paint!  There are many colors to choose from, and I’m picturing putting some wood pieces together in a flower shape with the Pink for a very cute flower pin.  You can do these for any kind of parties really, but wouldn’t they be darling for crafty gatherings?

Tags:
June 11, 2010

TGIF Project: #1 Dad Suncatcher

Father’s Day is coming up quickly (June 20th), and I’m well aware of how difficult it is to find something to make for that special guy in your life.  It reminds me of the time that I bought a leg lamp from A Christmas Story for my dad and a few years later found it unopened in the garage sale pile.  You’ll be pleased to know that I rescued it and it’s now at work!  Okay, maybe not the best choice of gifts.

I was drawn to this #1 Dad suncatcher because of the color palette (love my blues and greens) as well as the thought that my dad would probably actually use this.  He could hang it at work or in his home office.  If you have children, this is especially awesome because Gallery Glass is easy for children to use.  Get the instructions for the project here.

June 10, 2010

Technique Thursday: Using a Color Wheel

Most people know what a color wheel is from grade school art class – but have you used once since? I want to show you how I use my color wheel to help me choose paint colors. The great thing is that no formal education is required! You don’t have to go to four years of art school to follow along with my method.

A likely scenario for a crafter, using myself as an example: I recently pulled a piece of fabric out of my stash that I wanted to use in a project, and couldn’t figure out what colors I wanted to use with it. In comes the color wheel. I use an EK Success Rainbow Color Selector that was gifted to me. Here’s how I started:

I placed my color wheel down on my fabric and eyeballed my starting point – meaning I figured out where my fabric matched on the color wheel. At this point you’ll need to make a decision: what color combination works for you? My color wheel has a magic spinner center to help me answer this question! There are arrows that help me choose between the following options:

  • Complementary – color directly opposite your starting color
  • Triad – combining every fourth color on the wheel
  • Split Complement – your starting color and the two colors on the opposite sides of your complementary color

This may sound like Greek to you, but my color wheel comes with a complete instruction book to explain everything. Once you read the instruction book and start playing with the wheel, it will all make sense. I decided to do a color triad for my project.

I used the triangle on the wheel to guide me (and color chips in my pictures for illustration). The first color indicated by the wheel was in the Aqua family. . .

The second color suggested by the wheel was in the Orange family. Now I have two FolkArt paint colors to use on my project with my fabric! My colors are slightly wild, but no matter your color preferences, a color wheel will help you with your craft painting projects.

Tags:
June 9, 2010

Screenprinting Made Easy

I’ve been interested in painting on textiles recently, and I have to give major props to the Simply Screen line because I LOVE the paint!  The line is great because it has vibrant colors and stays soft after being washed. I’m not just saying that either – I’ve actually tried it and it’s the best textile paint I’ve used to date.  In addition to the paint, there are several screens available with many designs (like the one above).  I really like easy and quick when I’m making gifts, and Simply Screen is perfect.

Get instructions for the shirt above here.

June 8, 2010

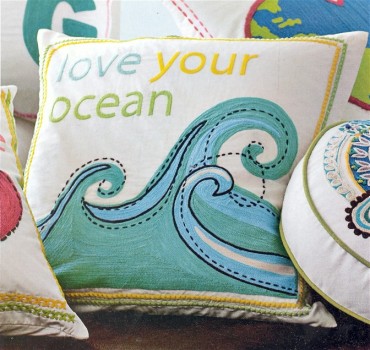
Tuesday Huesday: Love Your Ocean

Pottery Barn Teen, Early Summer 2010

Recent events have reignited concern for our oceans – I found this pretty pillow and thought it was appropriate!  In addition to the message, I love the stitching on the pillow. What a bright and pretty color palette, great for a party or a painted room decoration for a youngster.  Inspired by the pillow, here is today’s color palette.

I used Apple Barrel Acrylic paint to create my color palette (clockwise from top left): Pool Blue, Wintergreen, Canary Yellow, Caterpillar

June 7, 2010

Painting a Shower Curtain?

You may or may not be surprised at some of the uses for acrylic paint, but this is certainly a unique one.  Yes, you can paint a shower curtain!  Bust Magazine provides complete instructions here.  One of the best things? If you already have acrylic paint on hand, you can get a clear shower curtain liner for about $3 at many stores. Nothing beats a budget craft!

For a long lasting and water-resistant paint option, we recommend FolkArt Outdoor in addition to our acrylic spray sealers.